Tuesday, November 23, 2010

Portraits and self-portraits-start looking


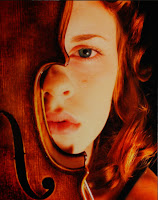
                                          Bekah Cunningham, Wakeland High School (Margie Raper)


Truman Capote, 1947


The first photograph caught my eye because it was just half of the girl's face and her eye, hair, and guitar stand out. What makes this picture a good photograph is that it's balanced; the guitar on the left side, her hair on the right. And they're like the same color. The second photograph got my attention by the loneliness shown here with this man sitting on a bench by some leaves or whatever that is behind him. For my next photographs I want to do them in portraits of someone else because to me, I feel like I can take more control of the background and everything else that might come out wrong. 


Making a B&W print


Equipment 

  • Enlargers 
Condenser Enlarger
Diffusion Enlarger
Color Head Enlarger 
  • Filters 
  • Safe Lights
  • Film Processing Tank
  • Thermometers
  • Print Trays
  • Timers
  • Print Washing Tray
  • Print Tongs

Film Processing Chemicals 
  • Film Developer
  • Stop Bath
  • Fixer - (Also called Hypo) 
  • Hypo Clearing Agent
  • "Wetting Agent" 
  • Chemical "Life Span"
  • Chemical Disposal 


The first thing you have to do when you're making a B&W photo is getting your film on the regular photo paper. Once you've done that, put the photo paper through a series of chemicals while timing them. The photo usually shouldn't have to stay in the chemical for more than two minutes. When you begin to see the picture on your photo paper(after the series of chemicals) you'll proceed to put your photo in water for about 10 minutes to stop all the chemicals from continuing to develop any further. After the 10 minutes are up, take the paper out of the water, squeegee the paper and let it finish drying.   

1. emulsion: a mixture of two or more immisible (unblendable) liquids.
2. aperture: a hole or an opening through which light travels.
3. masking easeUse photoshop masking, one of the most effective image manipulation techniques.This tutorial will focus on using Channels to help mask out a complex objects with clean edges.
4. exposure: the total amount of light allowed to fall on the sensor during the taking of a photograph
5. safe light: is a light source suitable for use in a photographic darkroom
6. dodging & burning: are terms used in photography for a technique used during the printing process to manipulate the exposure of a selected area(s) on a photographic print, deviating from the rest of the image's exposure.

Friday, November 19, 2010

Ethics In Fashion Photography

1. The changes that they made on the model on the computer were her eyes; they made them kind of wider. They made her lips bigger, enlarged her face a little, switched her hair around.

2. I really don't think it's ethically acceptable to change a person's appearance like that because everyone is beautiful the way they are already. I mean, they picked her to model because they liked the way she looked already, her appearance attracted their eyes, so there shouldn't be a need to change her..right?

3. I believe that there are circumstances in which it would be more ethically wrong to do this type of manipulation, such as maybe when someone's trying to look for a person and it might be like an emergency situation, but this person has a slightly different appearance, and they won't be able to identify them because the person looks different.

4. Well it was OK to move her hair around for that "swish" effect and that's pretty much the only good thing. The other things just changed her natural appearance, even though it was just a little bit. Her eyes, lips, neck, head. It's a different face.

5. I think that the difference between fashion photography and photojournalism is that in fashion photography, they don't just change up a little flaw, it's like the whole thing, or they change it to where it doesn't look the same anymore. It's like they're looking for the "perfect-model-type" face/appearance. And in photojournalism, it's still originality, just fixed up a little, as in the background, or angles.

6. Photojournalism is related to reality in the sense that it grasps in photos what is taking place all around us. In fashion photography, it relates to reality in the sense that it shows how we view beauty and how people think reality should actually be. This affects the ethical practice of each by the way that they have to be careful of whether what they are changing will completely change their intention of their photo and if it's an actual picture.
Wednesday, November 17, 2010

Negatives Evaluation

1. I believe all of my negatives turned out to come out pretty well. Maybe they aren't in a perfect shot or something, but you can see them clearly.

2. All of my shots came out clear, like I said above, none of them are blurry or too much/little light. They're good :)
3. Once again, all of them turned out good, but I'll probably have to say (or choose) the one with the teacher making the lab experiment because you can see everything she's doing, it's a pretty good shot and there's a lot of color in it. 

4. The technical aspect of photography that I used the most is 'focus' on all of my pictures. If you look at them, they're not blurry or out of place. That's my evidence. 

5. The rule of 'mergers and how to avoid them' is present in my favorite negative. Everything seems in place, the shot was taken at precisely what was supposed to be the focus of the picture, nothing is sticking out or around of the teacher.

Monday, November 15, 2010

Photo Manipulation And Ethics

The article was pretty much about that you can take a picture and if there happens to be a mistake or something, you just don't like in the picture, you can just change it. It's easy to loose your job over something like changing the photograph; it changes the "realness" of the photo. And pretty much makes the picture not real.

I don't believe the manipulation is very ethical. It makes the picture unreal whether it may look real or not, because it's changing the original picture to something that wasn't even taken. It can make the picture look better but that doesn't make it right. It just makes the picture fake.


To me, this picture is the most unethical. It completely put a person in there that wasn't even in the photo. They randomly put the this black guy from out of the nowhere in the picture. Who knows why.. O_o


This photo is the least ethical to me because the photo actually looks better. It shifted the woman walking on the left side of the picture, which also works as the rule of avoiding mergers. It also makes the picture have a better lighting focus.


Tuesday, November 9, 2010

Drug Cartels in Mexico

     "When I arrived in Juarez, within an hour, over the police scanners, a body has been found. And maybe 30 minutes later, another body. And then another body. And by the end of the day, it was 10. The next day, 10. The next day, 10." says journalist Jeff Antebi. From what I have read, this is a very dangerous and deadly place. Antebi mentions that you can have a distant family member that did something wrong and the cartels may be out on revenge looking maybe for you to even kill. He especially avoided being out at night because the cartels "own the night." Even the Politicians are "at risk of becoming targets." I personally think this is a horrible situation and something HAS to be done. I don't know what, but it has to.

     The picture that I liked is the one where two police officers are carrying what seems like a dead body to the van, down a dirt path, along a town. It seems like this photograph has the rule of balance because the van and part side of the town are on one side and the dirt path and officers are on the other side. I like this picture because it was a good shot, no mergers seem to be sticking out of anywhere and it doesn't seem as violent as the rest of the pictures.

Thursday, November 4, 2010

Post Shoot Reflection

1. Trying to get the emotions wasn't too hard. The majority of the people were into their work, not trying to show any emotions. It was, though, kind of hard to get the perfect lighting.
2. The exposure was the hardest because I had to pay more attention to it. I did have a difficult time trying to get the right lighting, but focusing the pictures was pretty easy and simple.
3. I tried to get the point of the pictures with higher and lower views, called as in 'creating depth' and the view points.
4. Pay attention to the exposure, since I was having a hard time with that. Also, I need to stop being shy and really try to focus on my pictures and not the people looking around me.

Tuesday, November 2, 2010

What the pros are doing- Repetition


                                                                     Slice of Heaven
-Judges rate Alpine cheese in Oberstdorf, Germany. Jury members at the 5th Alpine Cheese Olympics rated over 700 kinds of Alpine cheese from all over the world.

 In this picture, the tables are repeatedly lined up. What catches more the eye, is all the different pies placed on the tables; They're everywhere! There's some men there also, walking around, but the focus is more on the tables and pies.


                                                                   Happy Halloween
-A pattern of lights forms a giant 275-foot jack-o-lantern on the side of WaMu Center in downtown Seattle.

Yes, the first thing that comes to our eye is the ginormous (made-up word by me) pumpkin on the building. This picture looks very balanced because of the same amount of buildings on both sides, which even the center building out, and it looks repeated.


                                                                  Volumes of Vino
-Wine bottles await tasting during the 27th International Wine Challenge in London, England. 

Well, it's pretty obvious this is a repetition picture, needless to say. The different colored bottles scattered all over the place are really eye-catching.


Processing B&W film

 Materials

  • Film
  • Chemicals
  • Photo paper
Chemicals needed
  • Developer
  • Fixer
  • Stop Bath
  • Hypo Clear


Summary
When you get into the darkroom you need to remove the film from the cassette. Load the film onto a metal or plastic film reel, whichever is fine. You need to place the loaded reel in the film tank and cover it. You may turn on the light after. The film is now in a light tight container. Now you begin processing. First, set up your chemicals which include a film developer, a stop bath, a fixer with hardener, and a hypo eliminator bath. You need to make sure that the temperature of the chemicals is carefully controlled. The chemicals are affected by the speed of the film and the temperature of the developer. Next you have to pour developer into the open part of the sealed film tank and cover it. Leave it there for how ever long you are required to. When your done, take the lid off the sealed film tank and pour it out. Now pour running water into the film tank for one minute to stop development. It's time to use a fixer with hardener to fix the image to where it can be viewed in normal light. It will take somewhere around 5 to 10 minutes. After fixing, you remove the tank cover 
 completely and let the film settle in cold running water for 5 minutes. Now you need to remove all traces of the fixer to avoid the appearance of white spots on your negatives. Then pour in a tankful of Hypo eliminator and agitate for 2 minutes. Finally you wash it for another 5 minutes. Now pull the film out of the tank and hang the film  up to dry in a dust-free area. The film should be done drying after a couple hours.
 
Definitions
1. Contact sheet- a photographic image produced from film.
2. Agitation- keeping a chemical moving.
3. Enlarger- a specialized transparency projector used to produce photographic prints for film.
4. Developer- a solution used for developing a film or photographic paper.
5. Stop Bath- an acid rinse for stopping the action of a developer before fixing a negative or print.
6. Fixer- removes the undeveloped silver iodide from the emulsion.